
This time, I wanted to try my hand at more baking so had a couple of trial runs with the donuts and chocolate cake beforehand. For those of you who know me, you'd know that I'm no baker, I can whip up a simple basic marble cake or even cookies but that's about as far as my baking skills go. So I guess I should clarify first that this is not a professional baking blog, just sharing some ideas of organising a party. Hopefully, you are a better baker than I am! :)
So let's start with the invitation card..

Designed by the hub. Spiders can be scary and we were trying to soften the scare impact of his birthday. It is after all a birthday celebration and not a spider exhibition. ;) From here, we determined that the colour theme was going to be blue, purple and black.
Now I have to tell you all about my baking exploration! I wanted to start off with something I was more familiar with, cookies, the question was, how should I decorate the cookies?? I wasn't that good with icing so I wanted to keep it simple. In the end, I just baked some square scalloped shaped cookies and started modelling with fondant instead.
 |
| Helping me with the cookies |
 |
| Scalloped cookies |
 |
| Trying out a black fondant spider on parchment paper first |
 |
| More confident |
 |
| Ta-da! |

Next was donuts. I tried mini baked donuts for the first time. It was easy enough but I had trouble experimenting with the web icing.

 |
| Glazed with melted chocolate |
 |
| web icing |

Wanted a variation of colour so tried melting white chocolate but somehow, it didn't work. I wasted 3 batches of white chocolate buttons but it wasn't a smooth texture as you can see from the picture above. So I had to keep it mostly to milk chocolate.
 |
| Using a Wilton tip no.1 |
Overall, the donuts weren't very successful but it's ok. The kids didn't notice anything amiss. It tasted good. I baked and iced the donuts the night before the party so had to stack them between parchment paper but the next morning, I could see that the icing was "squashed" and "flattened". maybe some of you can give me some tips here.. :)
Ok, lets go on to something more cheerful! Cupcakes!

Again, the cupcakes were easy enough to bake. I had to think how to embellish it. So I ended up doing this ...

I wanted it to look like spikes. Initially, they looked more like flowers (you can see from the picture above, the ones in front) than spikes lol as I was pushing the icing into the middle rather than pulling it out but it got better with more practice :)


Once you add those eye candies onto the cupcake, it immediately has a life on its own. The spider legs and cupcake holder were bought from Wilton, ordered through Amazon. Here's an important tip, put those eye candies last. I made a mistake of putting them onto my Oreos and into the fridge, when I took it out and it condenses, the eyes started to "bleed". So I had to take out all of them eyes and re-attached new ones. It was a good thing I had enough. I suppose if you are having a Halloween party, it would be the effect you would have wanted.
Ok, onto the next food item, Oreo spiders! This was technically not a baking project unless you count rolling fondant as baking! I saw this idea on Pinterest and wanted to try it out. Initially I had wanted to buy macarons so that I can have the desired colours but it was expensive and I had too much things to prepare on the morning of the party to go and collect them so I decided on Oreos instead!

We took a styrofoam board and cut out into 3 triangles and joint them together with duct tape and then used a blue paper that you can buy from your local craft store to wrap it up to form a pyramid.
On to the fun part.. we used melted chocolate to adhere the eye candies to the Oreos. Let me repeat, do not put them into the fridge, the eye candies will bleed after you take them out. Just let them dry naturally and store them in an airtight container.


Here's how they look. Aren't they adorable? You can use a toothpick to stick behind the Oreos and into the styrofoam pyramid board. If your paper, in my case, the blue paper, is a little bit thick, just use a needle to poke a hole first before sticking the toothpick with the attached Oreo in. I ended it by adhering a big spider on the top of the pyramid so that it looks like they are spiderlings following the big mama spider.
Heres the last and definitely not least, baking project for this party, his birthday cake! ok ok, the spider and cricket were plastics but everything else was baked and decorated by me and the hub.

Started off with basic chocolate cake and buttercream.


He loved his cake and in his eyes, I was probably the best baker in the world!
Ok, so much for baking! I've probably hit my baking quotient for the whole year! On to the goodie bag! It was a fortuitous encounter for me to chance upon the goodie bags in the exact colours that I wanted while searching for other party stuffs.

Here a quick look at what's inside the bags. There were drawing paper, spider "eggs", trading cards, pencils, matchboxes with spiders. :)

More close ups
 |
| Trading cards of his favourite arachnids! |


Not sure if this is a universal culture but in days of old, kids used to catch spiders and put them in matchboxes. Not sure if our kids do that today(not mine), but the parents will surely appreciate this gesture.


I washi-taped the tip of the pencils so as to get the desired colours and hot-glued a spider on top!

I wanted to use green grapes originally which might have looked more authentic but I wanted to prepare these way before hand so they may not be as fresh so I figured Mentos mint sweets would work as well!
 |
| Colouring paper |

These were printed on large sheets of white paper by a professional printer and I used my circle die cut to cut out the shapes. These were adhered to the front of the goodie bag.


Simply get your plastic dessert plate, punch 8 holes(4 on each side) on the opposite edge of the plate, cut out your pipe cleaners to desire length of spider legs and fastened them to the holes. Take your googly eyes and here's a faster way, get your double sided tape ready and simple stick the eyes onto the tape. Then cut out 2 eyes and adhere them to the top of the plate.
The next one is the piñata. All the credit has to be given to the hub. He made it from scratch.


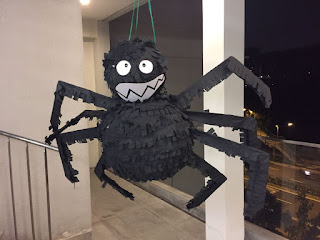


I had around 30 kids so I had to fold (30 x 8 legs) 240 strips of paper spider legs!

We had wanted to purchase a piñata but like I said in my previous post, it's difficult finding a non-Spiderman party stuffs so we couldn't find one. We then thought we'd just get something that was close to the shape of a spider perhaps even a circular one but it cost S$40 and wasn't ideal as well. In the end, we bought a paper lantern that cost S$2, some styrofoam for the head, some crepe paper and created our own. He watched Youtube and got some ideas from there..


Did you noticed we used a fly swatter for the piñata?? I mean, what else would you use to hit a creepy crawly? :)
In line with my hub's creativity, we want to do a wall that was worthy of photo-taking. To get one printed for our wall that was mighty big, it would have cost around S$200. So my ever genius hub took to the idea of creating web himself on the wall!

He used ribbons, white tack and a ladder to stick the ribbon around and on the wall! Love the effect! and big enough too to take group pictures.

The only thing we bought was the hairy spider during Halloween! We had so much fun with the photo wall (can't quite call it a booth I suppose).


 |
| Stuck on the web!! |

 |
| Goofing around with his creation |
My hub also designed the backdrop of our dessert table and got it printed by a professional printer. These were decal stickers which he then stuck it on the wall himself.. The designs were the same theme as the invitation card.

On the dessert table, you will also find water bottles for the kids...

as well as Kit Kats wrapped with our own customised labels.

Next is the spider hats. I pre-folded and pre-cut the hats and paper legs. And at the party, the kids and mummies did some simple crafting to make a spider hat, 8 eyes and all!

 |
| spider crown |
 |
| spider wiggly legs |

It was all worth it! They love it!
And I can't believe you've read it all the way to the end! Clap! Clap! :)
Quite amazing we did so much by hand but we did enjoy ourselves although there were parts of the process where we thought we were actually going bonkers! haha.. But during and after the party, Ollie saw what we had done and was constantly thanking us and we were even elevated to the best mama and papa in the world status! Glad he was thankful for all that preparation.
So I hope you will find some useful tips here when you plan for your own party!

Happy birthday, sweetheart! We love you!